


 23 / 46

25
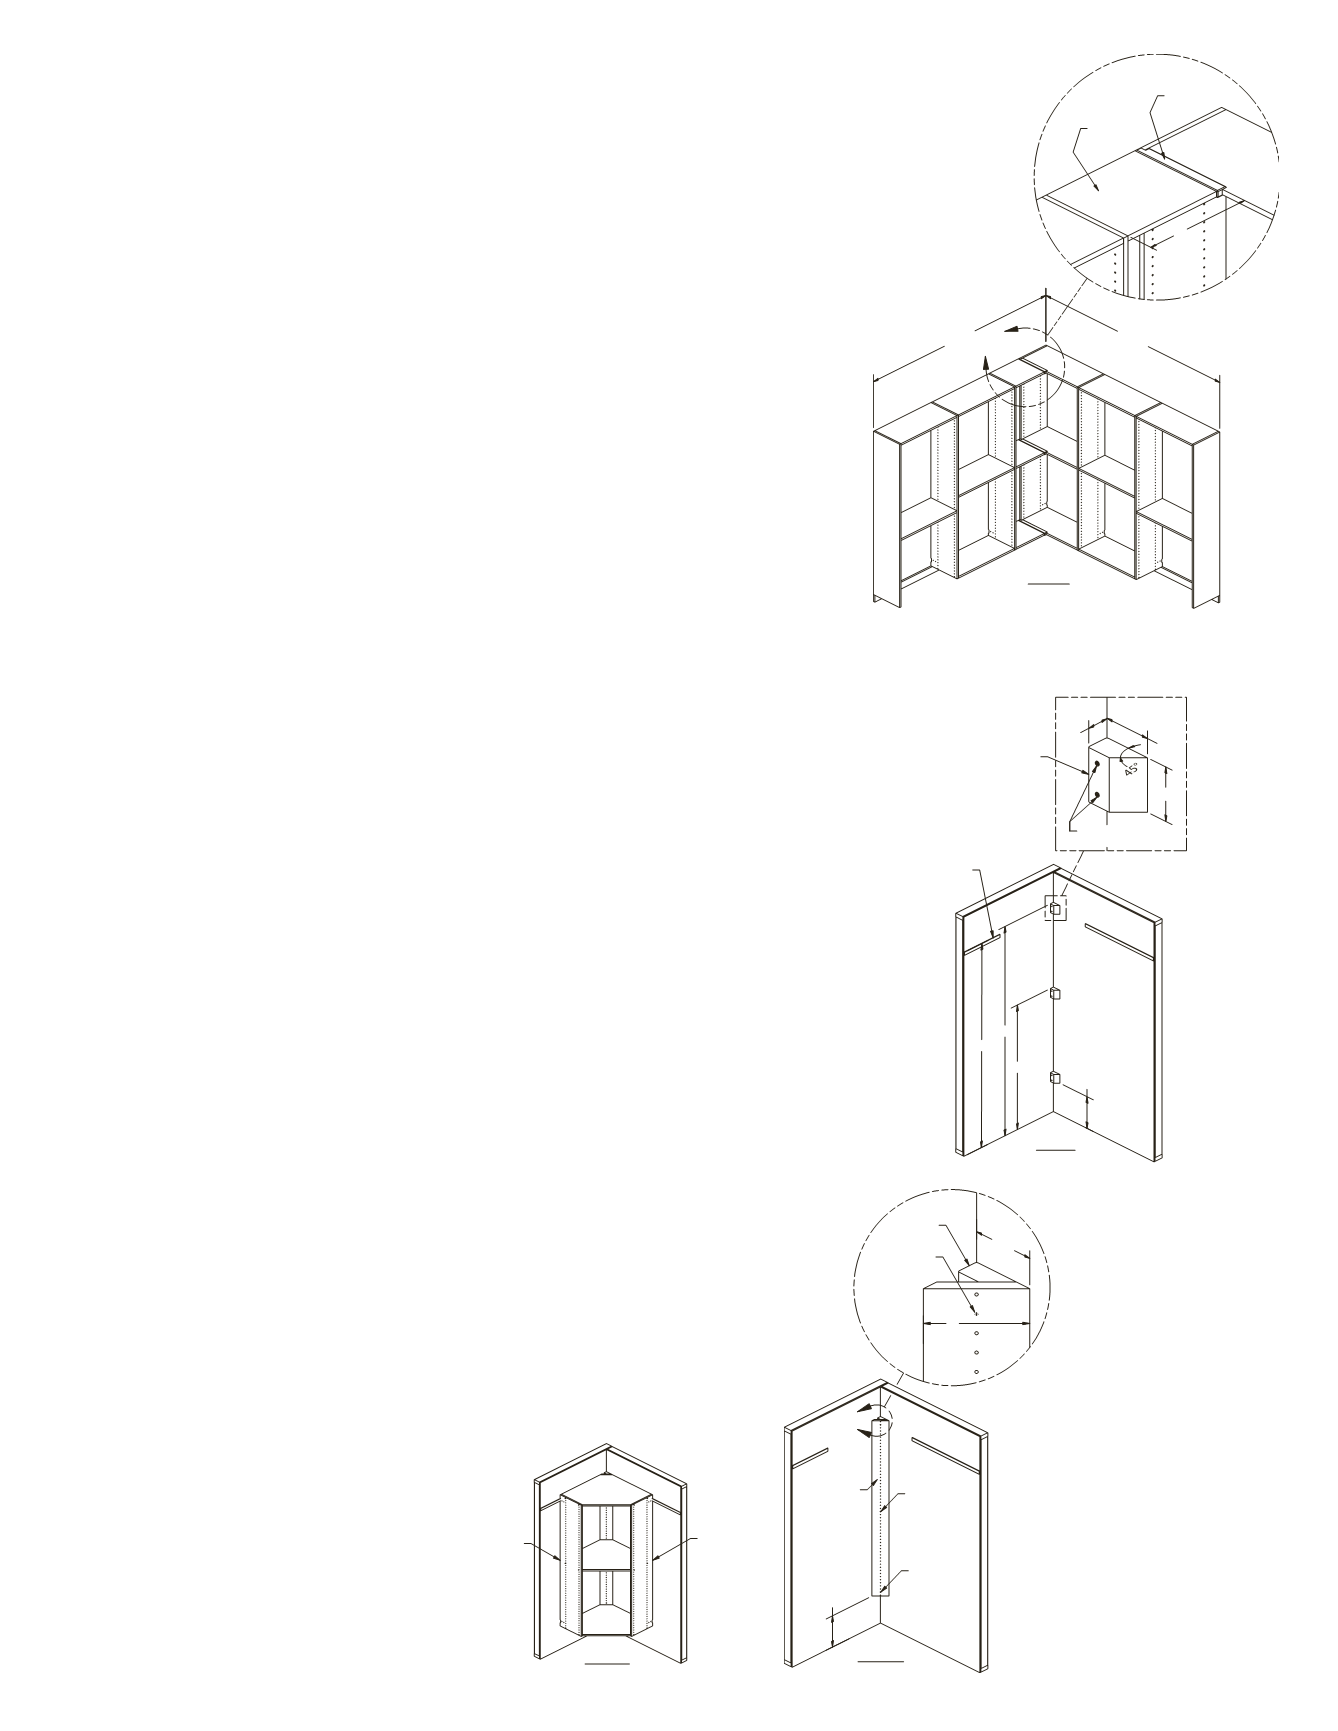
E. Typical Corner Assembly Using Bridge Supports
1. Starting in the corner, install the components along Wall “A”
following the previous Closets Installation Instructions.
2. Determine the width of the Assembly along Wall “B” and mark
the location of the Outside Vertical Panel. Starting at the outside
and working toward the corner, install the components following
the previous Closets Installation Instructions.
Note:
The Wall Rail
should extend at least to the inside of the last Vertical Panel but
must be a minimum of 14” from the corner.
3. To complete the Corner installation, measure the distance from
the front of the components along Wall "A" to the inside of the last
Vertical Panel along Wall “B”. This will be dimension “A” shown in
Figure 7, Detail A
. Subtract 3⁄16” from dimension “A”. Cut the Fixed
Shelves to this dimension leaving the Cam Fasteners in the end of
the shelf opposite of the corner.
4. Position the top Fixed Shelf and tighten the Cam Fasteners over
the Connecting Bolts. Place the Bridge Support over the front
edge of the adjacent Fixed Shelf on Wall “A” and slide toward
the wall over the end of the “cut-to-fit” Fixed Shelf. Repeat these
procedures for the remaining Fixed Shelves and any Adjustable
Shelves in the corner installation.
F. Typical Diagonal or Radius Corner Assembly
1. Install Wall Rails at the required height following the previous Closets
Installation Instructions. Mark the finished height in the corner. For this
example, the finished height is 84”.
2. Prepare and install blocking in the corner as shown in
Figure 8, Detail A
.
The blocking must be fastened securely to a wall stud.
3. Position the Diagonal Corner Back Support in the corner as shown in
Figure 9
and secure to the blocking with #8, 2” Woodscrews at the
designated locations.
Alternate Attachment Method:
Omit the blocking in
Figure 8
and attach
the Diagonal Corner Back Support in the corner at the designated location
using #8, 6" woodscrews in place of the #8, 2”. The Diagonal Corner Back
Support must be securely fastened to a wall stud.
4. Complete the Corner installation by hanging the Vertical Panels and
installing Fixed and Adjustable Shelves following the previous Closets
Installation Instructions.
See Figure 10.
A
A
Figure 7
Wall B
Wall A
Fixed Shelf
Cut-to-Fit
Bridge Support
B
Blocking
#8 x 2"
Woodscrew
(not supplied)
Figure 9
#8, 2"
Woodscrew
(1) hole below
center
#8, 2"
Woodscrew
2nd hole
from bottom
Diagonal Corner
Back Support
4¼
6
12 ⁄₁₆
Figure 10
Fixed Shelf
Fixed
Shelf
Fixed
Shelf
Vertical
Panel
Vertical
Panel
A
#8 x 3
1
/
2
" Woodscrew
(not supplied)
2 x 4 or other
suitable blocking
(not supplied)
Wall Rail
Figure 8
82
84
50
12
11
/
16
3
3
/
16
1
1
/
2
3
1
/
2