


 22 / 46

24
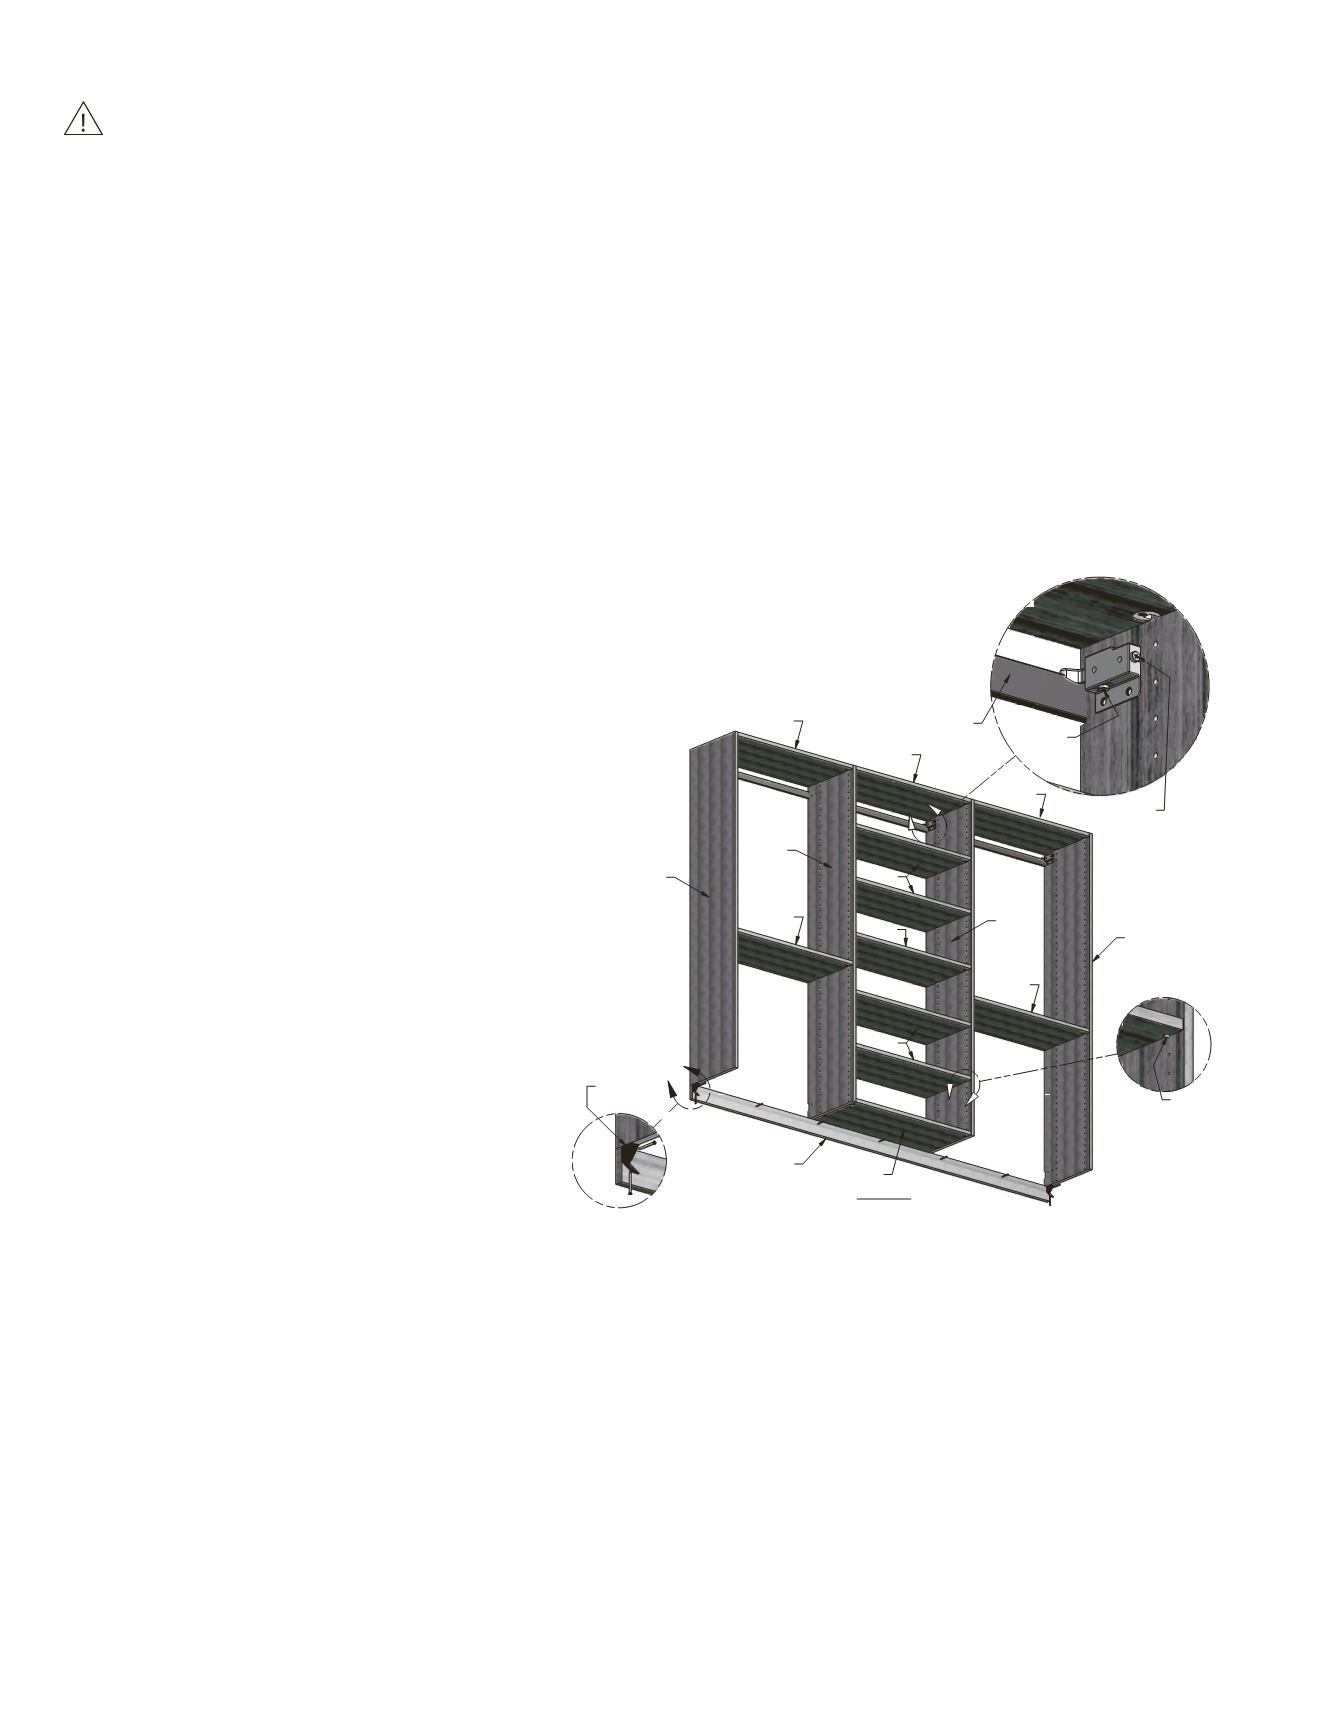
D. Typical Closet Assembly
FOR SAFETY PURPOSES, IT IS RECOMMENDED THAT TWO PEOPLE WORK TOGETHER WHEN INSTALLING HEAVY
COMPONENTS SUCH AS A TOWER UNIT.
The Closet Assembly shown in
Figure 6
is a basic installation consisting of a center Tower Unit flanked by a
section on each side which provide two 41" spaces each for hanging clothes. Your particular application may
vary.
1. Be sure to install the Wall Rail Cover before hanging any components.
See Figure 3.
Lift the assembled Tower
Unit and hang on the Wall Rail by hooking the Panel Hangers over the top of the Wall Rail. Loosen the Depth
Adjustment Screw on the Panel Hanger if necessary.
See Figure 6, Detail C
. Position the unit in the desired
locations and tighten the Depth Adjustment to pull the unit to the wall.
2. Hang the Outside Vertical Panels in their approximate location. Starting at the top, position the Fixed Shelves,
align the Connecting Bolts with their corresponding Cam Fasteners, push the parts together and secure by
tightening the Cam Fasteners with a #2 Phillips Head Screwdriver. Repeat the process for each Fixed Shelf.
3. Level the top of the assembled unit by utilizing the Panel Hanger Height Adjustment.
See Figure 6, Detail C.
Cut theFiller/Support Strip length to match the overall width of the assembly. Mark the wall stud locations and
transfer these locations to the Filler/Support Strip. Using a ⅛" drill bit, drill pilot holes through the Filler/Support
Strip. Position the Filler/Support Strip
tightly against the wall and the bottom of
the assembly and secure to the wall studs
using #8, 2" HiLo Screws.
4. Secure the bottom ends of the Outside
Vertical Panels to the Filler/Support Strip
using Angle Brackets (paintable to match)
and #8, 2" HiLo Screws.
See
Figure 6,
Detail D
. Secure the bottom of the Tower
Unit to the Filler/Support Strip using
Angle Brackets or by installing #8, 2" HiLo
Screws through the back inside edge of
the lower Fixed Shelf and into the top
edge of the Filler/Support Strip.
5. Install Adjustable Shelves at the desired
locations by inserting Shelf Pins into the
5mm holes located in the Vertical Panels
and placing the shelves on top of the Shelf
Pins.
See Figure 6, Detail E.
C
E
D
Fixed
Shelf
Fixed
Shelf
FixedShelf
Fixed Shelf
Fixed Shelf
Fixed Shelf
Fixed Shelf
Filler/Support Strip
Attach to wall using
#8, 2" HiLo Screws
Outside
Vertical
Panel
Inside
Vertical
Panel
Outside
Vertical
Panel
Adj.Shelf
Inside
Vertical
Panel
ShelfPin
Adj.Shelf
Height
Adjustment
Depth
Adjustment
Wall Rail with
Cover installed
Angle
Bracket
Figure 6